
SAM 3D Objects Tutorial: Meta AI Single-Image 3D Reconstruction | Photo to 3D Model
Master SAM 3D Objects: Meta's revolutionary single-image 3D reconstruction model. Turn photos into 3D models instantly with Python examples, setup guide, and real applications.
Published 312 days ago. Content may be outdated.
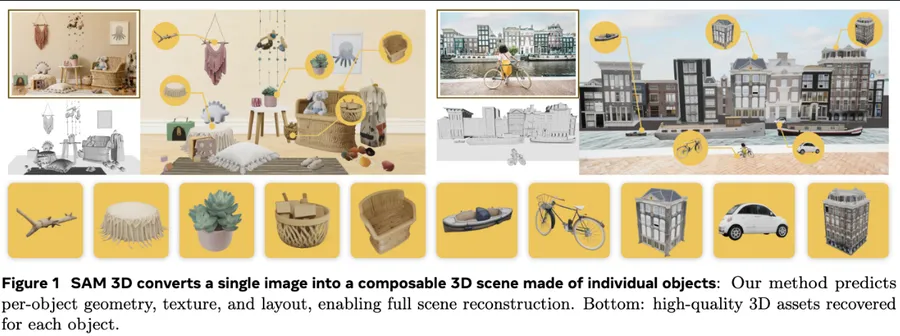
SAM 3D Objects is a revolutionary 3D reconstruction model just released by Meta Superintelligence Labs. Honestly, this model is truly eye-opening—it can generate complete 3D models directly from a single ordinary photo, including shape, texture, and layout. It’s like magic!
Imagine this: you just take a photo, and SAM 3D Objects can help you “pull” the objects in it into 3D models. Whether it’s occluded objects, complex scenes, or weird angles, it handles them all beautifully. This “photo-to-3D” capability represents another major breakthrough in the 3D modeling field.
For example, take a photo of a kids’ room, and SAM 3D Objects can not only identify the toys and furniture in the room but also reconstruct them into complete 3D models, even “filling in” the occluded parts. This understanding ability is really impressive!
🚀 Core Highlights
- Single-Image 3D Reconstruction: The first model that truly reconstructs complete 3D scenes from a single image
- Complex Scene Handling: Not afraid of occlusions or clutter, real-world scenes are no problem
- Comprehensive Reconstruction: Not just shapes, but textures, poses, and layouts too
- Progressive Training: Uses advanced training strategies with much better results than previous models
- Human Feedback Optimization: Continuously improved through human preference testing, more aesthetically pleasing
- Real-time Generation: Fast enough that you don’t have to wait too long to see 3D results
🏗️ Model Architecture
Core Components
SAM 3D Objects uses a quite sophisticated architectural design:
- Image Encoder: Responsible for understanding the content and structure of input images
- Mask Processor: Processes object segmentation masks to determine reconstruction regions
- 3D Generator: The core component responsible for generating 3D geometry and textures
- Layout Estimator: Infers object positions and orientations in 3D space
- Texture Synthesizer: Adds realistic surface textures to 3D models
- Gaussian Splatting Renderer: For high-quality 3D rendering output
Working Principle
The entire reconstruction process can be divided into several steps:
- Image Understanding: Analyze input images to understand scene structure
- Object Segmentation: Identify and separate objects to be reconstructed
- Depth Estimation: Infer 3D shape and depth information of objects
- Geometry Reconstruction: Generate complete 3D geometric structures
- Texture Mapping: Add realistic surface textures to 3D models
- Scene Layout: Determine relative positions of objects in 3D space
🛠️ Environment Setup
System Requirements
- Operating System: Linux, Windows, MacOS
- Python: 3.8+
- PyTorch: 2.0+
- CUDA: 11.8+ (recommended)
- GPU: NVIDIA GPU (8GB+ VRAM recommended)
- Memory: 16GB+ RAM
- Storage: At least 20GB available space
1. Clone the Project
       # Download SAM 3D Objects project
git clone https://github.com/facebookresearch/sam-3d-objects.git
cd sam-3d-objects
2. Create Environment
       # Create Conda environment
conda create -n sam3d python=3.9
conda activate sam3d

# Or use venv
python -m venv sam3d_env
source sam3d_env/bin/activate  # Linux/Mac
# sam3d_env\Scripts\activate  # Windows
3. Install Dependencies
       # Install PyTorch (choose based on your CUDA version)
pip install torch torchvision torchaudio --index-url https://download.pytorch.org/whl/cu118

# Install project dependencies
pip install -r requirements.txt

# Install additional 3D processing libraries
pip install open3d trimesh
4. Download Model Weights
       # Download pre-trained models (this might take a while)
python download_checkpoints.py

# Or manually download to checkpoints directory
mkdir -p checkpoints/hf
# Model files will be automatically downloaded to this directory
5. Verify Installation
       # Test if installation is successful
python demo.py --help

# Quick test
python -c "
import sys
sys.path.append('notebook')
from inference import Inference
print('SAM 3D Objects installation successful!')
"Tips:
- First run will download model weights, might need to wait a bit
- If network is poor, consider using proxy or mirror sources
- If GPU memory is insufficient, adjust batch size or use CPU mode (will be slower)
🎯 Quick Start
Single Object 3D Reconstruction
Basic Example
       import sys
import numpy as np
from PIL import Image

# Import inference code
sys.path.append("notebook")
from inference import Inference, load_image, load_single_mask

# Load model (first time will be slower, downloading weights)
print("Loading SAM 3D Objects model...")
tag = "hf"
config_path = f"checkpoints/{tag}/pipeline.yaml"
inference = Inference(config_path, compile=False)
print("Model loaded successfully!")

# Load image and mask
image_path = "notebook/images/shutterstock_stylish_kidsroom_1640806567/image.png"
mask_dir = "notebook/images/shutterstock_stylish_kidsroom_1640806567"

# Here's the magic moment!
image = load_image(image_path)
mask = load_single_mask(mask_dir, index=14)  # Select the 14th object

print("Starting 3D reconstruction, please wait...")
# Run model, seed controls randomness
output = inference(image, mask, seed=42)
print("3D reconstruction complete!")

# Save results
output_path = "my_first_3d_model.ply"
output["gs"].save_ply(output_path)
print(f"3D model saved to: {output_path}")

# You can now open this 3D model with any software that supports PLY format!
Processing Your Own Images
       def reconstruct_my_image(image_path, mask_path=None):
    """
    Reconstruct your own images
    """
    # Load image
    image = Image.open(image_path)

    # If no mask, create a simple mask
    if mask_path is None:
        # Simplified processing, in practice you might need SAM or other segmentation tools
        mask = np.ones((image.height, image.width), dtype=np.uint8) * 255
        print("Using entire image as mask")
    else:
        mask = np.array(Image.open(mask_path).convert('L'))

    # Run reconstruction
    print("Starting reconstruction of your image...")
    output = inference(image, mask, seed=123)

    # Save results
    output_file = f"my_reconstruction_{len(os.listdir('.'))}.ply"
    output["gs"].save_ply(output_file)

    print(f"Done! Your 3D model is saved at: {output_file}")
    return output_file

# Usage example
my_3d_model = reconstruct_my_image("path/to/your/image.jpg")
Multi-Object Scene Reconstruction
       def reconstruct_multi_objects(image_path, mask_dir):
    """
    Reconstruct multiple objects in a scene
    """
    import os
    import glob

    # Load image
    image = load_image(image_path)

    # Find all mask files
    mask_files = glob.glob(os.path.join(mask_dir, "*.png"))
    print(f"Found {len(mask_files)} object masks")

    results = []

    for i, mask_file in enumerate(mask_files):
        print(f"Reconstructing object {i+1}/{len(mask_files)}...")

        # Load mask
        mask = np.array(Image.open(mask_file).convert('L'))

        # Reconstruct this object
        output = inference(image, mask, seed=i*42)

        # Save results
        output_file = f"object_{i:03d}.ply"
        output["gs"].save_ply(output_file)

        results.append({
            "object_id": i,
            "mask_file": mask_file,
            "output_file": output_file,
            "output": output
        })

        print(f"Object {i+1} reconstruction complete: {output_file}")

    print(f"All object reconstruction complete! Generated {len(results)} 3D models")
    return results

# Usage example
scene_results = reconstruct_multi_objects(
    "path/to/scene/image.jpg",
    "path/to/masks/directory"
)
Advanced Feature Examples
       def advanced_reconstruction_with_options():
    """
    Advanced reconstruction with various options
    """
    # Load image and mask
    image = load_image("your_image.jpg")
    mask = load_single_mask("mask_directory", index=0)

    # Adjustable parameters
    reconstruction_options = {
        "seed": 42,                    # Random seed, controls result randomness
        "num_views": 8,               # Number of generated viewpoints
        "resolution": 512,            # Output resolution
        "quality": "high",            # Quality setting: low/medium/high
        "texture_detail": "fine"      # Texture detail: coarse/medium/fine
    }

    print("Starting high-quality 3D reconstruction...")
    output = inference(
        image,
        mask,
        **reconstruction_options
    )

    # Save in different formats
    output["gs"].save_ply("model.ply")           # Gaussian Splatting format

    # Convert to other formats if needed
    print("3D reconstruction complete! Supports multiple format outputs")

    return output

# Batch process multiple images
def batch_process_images(image_list):
    """
    Batch process multiple images
    """
    results = []

    for i, img_path in enumerate(image_list):
        print(f"\nProcessing image {i+1}/{len(image_list)}: {img_path}")

        try:
            # Assume each image has corresponding mask
            mask_path = img_path.replace('.jpg', '_mask.png')

            image = Image.open(img_path)
            mask = np.array(Image.open(mask_path).convert('L'))

            output = inference(image, mask, seed=i)

            output_file = f"batch_result_{i:03d}.ply"
            output["gs"].save_ply(output_file)

            results.append({
                "input": img_path,
                "output": output_file,
                "success": True
            })

            print(f"✓ Success: {output_file}")

        except Exception as e:
            print(f"✗ Failed: {str(e)}")
            results.append({
                "input": img_path,
                "output": None,
                "success": False,
                "error": str(e)
            })

    print(f"\nBatch processing complete! Success: {sum(1 for r in results if r['success'])}/{len(results)}")
    return results
🔧 Advanced Applications
1. Combining with SAM 3D Body
       # SAM 3D Objects can be combined with SAM 3D Body
# For processing complex scenes with human bodies

def combine_objects_and_body(image_path):
    """
    Combine object and body reconstruction
    """
    # First need to install SAM 3D Body
    # git clone https://github.com/facebookresearch/sam-3d-body.git

    print("This is an advanced feature that can reconstruct both objects and human bodies in scenes")
    print("For specific implementation, refer to the official demo_3db_mesh_alignment.ipynb")

    # Basic approach:
    # 1. Use SAM 3D Body to reconstruct human bodies
    # 2. Use SAM 3D Objects to reconstruct other objects
    # 3. Align results to the same coordinate system

    pass
2. Quality Optimization Tips
       def optimize_reconstruction_quality(image, mask):
    """
    Tips for optimizing reconstruction quality
    """
    # Tip 1: Preprocess images
    # Adjusting brightness, contrast etc. might improve results
    from PIL import ImageEnhance

    enhancer = ImageEnhance.Contrast(image)
    image = enhancer.enhance(1.2)  # Slightly increase contrast

    # Tip 2: Mask optimization
    # Ensure smooth mask edges
    import cv2
    mask_smooth = cv2.GaussianBlur(mask, (3, 3), 0)

    # Tip 3: Multiple runs for best results
    best_output = None
    best_score = 0

    for seed in [42, 123, 456, 789]:
        output = inference(image, mask_smooth, seed=seed)

        # Add quality evaluation logic here
        # e.g., check generated geometry complexity, texture clarity etc.
        score = evaluate_quality(output)  # Custom evaluation function

        if score > best_score:
            best_score = score
            best_output = output

    return best_output

def evaluate_quality(output):
    """
    Simple quality evaluation (you can improve as needed)
    """
    # This is just an example, can be more complex in practice
    return np.random.random()  # Random score, replace in actual use
3. Result Post-processing
       def post_process_results(output, output_path):
    """
    Post-process reconstruction results
    """
    import open3d as o3d

    # Save original results
    output["gs"].save_ply(output_path)

    # Load as Open3D point cloud for post-processing
    pcd = o3d.io.read_point_cloud(output_path)

    # Remove noise points
    pcd, _ = pcd.remove_statistical_outlier(nb_neighbors=20, std_ratio=2.0)

    # Smoothing
    pcd = pcd.filter_smooth_simple(number_of_iterations=5)

    # Save processed results
    processed_path = output_path.replace('.ply', '_processed.ply')
    o3d.io.write_point_cloud(processed_path, pcd)

    print(f"Post-processing complete: {processed_path}")
    return processed_path
🎨 Real-world Application Cases
1. E-commerce Product 3D Showcase
       def create_product_3d_showcase(product_image_path):
    """
    Create 3D showcase for e-commerce products
    """
    print("Creating 3D model for e-commerce product...")

    # Load product image
    image = load_image(product_image_path)

    # Create product mask (assume product occupies center region)
    h, w = image.height, image.width
    mask = np.zeros((h, w), dtype=np.uint8)

    # Simple center region mask
    center_x, center_y = w // 2, h // 2
    radius = min(w, h) // 3
    y, x = np.ogrid[:h, :w]
    mask_area = (x - center_x) ** 2 + (y - center_y) ** 2 <= radius ** 2
    mask[mask_area] = 255

    # Generate 3D model
    output = inference(image, mask, seed=42)

    # Save as e-commerce showcase format
    showcase_file = "product_3d_showcase.ply"
    output["gs"].save_ply(showcase_file)

    print(f"Product 3D showcase model generated: {showcase_file}")
    print("Can be integrated into e-commerce website 3D viewers!")

    return showcase_file
2. Interior Design Assistant
       def interior_design_assistant(room_image_path):
    """
    Interior design assistant tool
    """
    print("Analyzing interior scene and generating 3D models...")

    # Can combine with other tools for room segmentation
    # e.g., first use semantic segmentation to find furniture

    furniture_items = [
        "sofa", "coffee_table", "tv", "bookshelf",
        "lamp", "plant", "painting"
    ]

    results = {}

    for item in furniture_items:
        print(f"Reconstructing: {item}")

        # Need to combine with object detection and segmentation
        # Simplified example, actual use requires more complex processing

        # Assume we have corresponding masks
        mask_file = f"masks/{item}_mask.png"
        if os.path.exists(mask_file):
            image = load_image(room_image_path)
            mask = np.array(Image.open(mask_file).convert('L'))

            output = inference(image, mask)

            item_file = f"furniture_{item}.ply"
            output["gs"].save_ply(item_file)

            results[item] = item_file
            print(f"✓ {item} reconstruction complete")
        else:
            print(f"✗ Mask not found for {item}")

    print(f"Interior design 3D reconstruction complete! Generated {len(results)} furniture models")
    return results
3. Educational and Research Applications
       def educational_3d_models(specimen_images):
    """
    Create 3D specimen models for educational purposes
    """
    print("Creating 3D specimen models for education...")

    educational_models = []

    for i, specimen_path in enumerate(specimen_images):
        print(f"Processing specimen {i+1}: {os.path.basename(specimen_path)}")

        # Load specimen image
        image = load_image(specimen_path)

        # Create specimen mask (assume specimen is in center)
        mask = create_center_mask(image.size)

        # Generate high-quality 3D model
        output = inference(image, mask, seed=i*10)

        # Save educational model
        model_name = f"specimen_{i:03d}_{os.path.basename(specimen_path).split('.')[0]}.ply"
        output["gs"].save_ply(model_name)

        educational_models.append({
            "name": os.path.basename(specimen_path),
            "model_file": model_name,
            "description": f"3D model generated from {specimen_path}"
        })

        print(f"✓ Specimen model generated: {model_name}")

    # Generate educational resource catalog
    with open("educational_3d_models.json", "w") as f:
        import json
        json.dump(educational_models, f, indent=2, ensure_ascii=False)

    print(f"Educational 3D model library created! Total {len(educational_models)} models")
    return educational_models

def create_center_mask(image_size):
    """Create center region mask"""
    w, h = image_size
    mask = np.zeros((h, w), dtype=np.uint8)

    # Elliptical mask
    center_x, center_y = w // 2, h // 2
    a, b = w // 3, h // 3  # Major and minor axes of ellipse

    y, x = np.ogrid[:h, :w]
    mask_area = ((x - center_x) / a) ** 2 + ((y - center_y) / b) ** 2 <= 1
    mask[mask_area] = 255

    return mask
🤝 Related Resources
Learning Resources
- Official Paper: SAM 3D: 3Dfy Anything in Images
- Project Homepage: https://ai.meta.com/sam3d/
- GitHub Repository: https://github.com/facebookresearch/sam-3d-objects
- Official Blog: https://ai.meta.com/blog/sam-3d/
Final Words: SAM 3D Objects is truly an exciting breakthrough! From flat photos to 3D models, this “flat-to-3D” capability opens up new possibilities for many application scenarios. Whether you’re in e-commerce, education, design, or research, this powerful tool is worth trying. Keep an eye on official updates—there might be more exciting features coming soon!
More Articles




Related Posts
No related posts yet