
CV 14 min read
SAM 3D Objects教程:Meta AI单图3D重建模型|一张图片秒变3D模型
SAM 3D Objects教程:Meta最新单图3D重建模型完全指南。一张图片秒变3D模型,支持复杂场景和遮挡处理。包含详细安装步骤、Python代码示例、实战案例。零基础快速上手SAM 3D,让你的图片立体起来!
本文发布于 312 天前,内容可能已过时,请注意甄别。
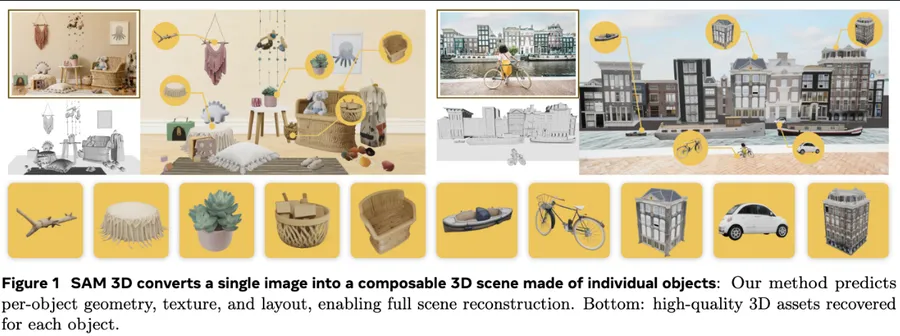
SAM 3D Objects 是 Meta Superintelligence Labs 刚刚发布的革命性3D重建模型。说实话,这个模型真的让人眼前一亮——它能从一张普通照片直接生成完整的3D模型,包括形状、纹理和布局,简直就像变魔术一样!
想象一下,你只需要拍一张照片,SAM 3D Objects 就能帮你把里面的物体”拉”成立体的3D模型。不管是被遮挡的物体、复杂的场景,还是各种奇怪的角度,它都能处理得很好。这种”一图变3D”的能力,可以说是3D建模领域的又一次重大突破。
举个例子,你拍一张儿童房的照片,SAM 3D Objects 不仅能识别出房间里的玩具、家具,还能把它们重建成完整的3D模型,连被遮挡的部分都能”脑补”出来。这种理解能力真的很厉害!
🚀 核心亮点
- 单图3D重建:这是第一个真正能从单张图片重建完整3D场景的模型
- 处理复杂场景:不怕遮挡、不怕杂乱,真实场景照样搞定
- 全方位重建:不只是形状,连纹理、姿态、布局都能重建
- 渐进式训练:采用先进的训练策略,效果比以往模型好很多
- 人类反馈优化:通过人类偏好测试不断改进,更符合人的审美
- 实时生成:速度够快,不用等太久就能看到3D效果
🏗️ 模型架构
核心组件
SAM 3D Objects 采用了一套相当精巧的架构设计:
- 图像编码器:负责理解输入图片的内容和结构
- 掩码处理器:处理物体的分割掩码,确定要重建的区域
- 3D生成器:这是核心部分,负责生成3D几何和纹理
- 布局估计器:推断物体在3D空间中的位置和朝向
- 纹理合成器:为3D模型添加逼真的表面纹理
- Gaussian Splatting渲染器:用于高质量的3D渲染输出
工作原理
整个重建过程可以分为几个步骤:
- 图像理解:分析输入图片,理解场景结构
- 物体分割:识别并分离出要重建的物体
- 深度估计:推断物体的3D形状和深度信息
- 几何重建:生成完整的3D几何结构
- 纹理映射:为3D模型添加真实的表面纹理
- 场景布局:确定物体在3D空间中的相对位置
🛠️ 环境安装
系统要求
- 操作系统:Linux、Windows、MacOS
- Python:3.8+
- PyTorch:2.0+
- CUDA:11.8+(推荐)
- GPU:NVIDIA GPU(推荐 8GB+ 显存)
- 内存:16GB+ RAM
- 存储空间:至少 20GB 可用空间
1. 克隆项目
       # 下载 SAM 3D Objects 项目
git clone https://github.com/facebookresearch/sam-3d-objects.git
cd sam-3d-objects
2. 创建环境
       # 创建 Conda 环境
conda create -n sam3d python=3.9
conda activate sam3d

# 或者使用 venv
python -m venv sam3d_env
source sam3d_env/bin/activate  # Linux/Mac
# sam3d_env\Scripts\activate  # Windows
3. 安装依赖
       # 安装 PyTorch(根据你的CUDA版本选择)
pip install torch torchvision torchaudio --index-url https://download.pytorch.org/whl/cu118

# 安装项目依赖
pip install -r requirements.txt

# 安装额外的3D处理库
pip install open3d trimesh
4. 下载模型权重
       # 下载预训练模型(这个可能需要等一会儿)
python download_checkpoints.py

# 或者手动下载到 checkpoints 目录
mkdir -p checkpoints/hf
# 模型文件会自动下载到这个目录
5. 验证安装
       # 测试安装是否成功
python demo.py --help

# 快速测试
python -c "
import sys
sys.path.append('notebook')
from inference import Inference
print('SAM 3D Objects 安装成功!')
"小贴士:
- 第一次运行会下载模型权重,可能需要等一段时间
- 如果网络不好,可以考虑使用代理或者镜像源
- GPU显存不够的话,可以调整batch size或者使用CPU模式(会比较慢)
🎯 快速开始
单物体3D重建
基础示例
       import sys
import numpy as np
from PIL import Image

# 导入推理代码
sys.path.append("notebook")
from inference import Inference, load_image, load_single_mask

# 加载模型(第一次会比较慢,要下载权重)
print("正在加载 SAM 3D Objects 模型...")
tag = "hf"
config_path = f"checkpoints/{tag}/pipeline.yaml"
inference = Inference(config_path, compile=False)
print("模型加载完成!")

# 加载图片和掩码
image_path = "notebook/images/shutterstock_stylish_kidsroom_1640806567/image.png"
mask_dir = "notebook/images/shutterstock_stylish_kidsroom_1640806567"

# 这里就是见证奇迹的时刻!
image = load_image(image_path)
mask = load_single_mask(mask_dir, index=14)  # 选择第14个物体

print("开始3D重建,请稍等...")
# 运行模型,seed可以控制随机性
output = inference(image, mask, seed=42)
print("3D重建完成!")

# 保存结果
output_path = "my_first_3d_model.ply"
output["gs"].save_ply(output_path)
print(f"3D模型已保存到: {output_path}")

# 你现在可以用任何支持PLY格式的软件打开这个3D模型了!
处理自己的图片
       def reconstruct_my_image(image_path, mask_path=None):
    """
    重建你自己的图片
    """
    # 加载图片
    image = Image.open(image_path)

    # 如果没有掩码,我们可以创建一个简单的掩码
    if mask_path is None:
        # 这里简化处理,实际使用中你可能需要用SAM或其他分割工具
        mask = np.ones((image.height, image.width), dtype=np.uint8) * 255
        print("使用整张图片作为掩码")
    else:
        mask = np.array(Image.open(mask_path).convert('L'))

    # 运行重建
    print("开始重建你的图片...")
    output = inference(image, mask, seed=123)

    # 保存结果
    output_file = f"my_reconstruction_{len(os.listdir('.'))}.ply"
    output["gs"].save_ply(output_file)

    print(f"搞定!你的3D模型保存在: {output_file}")
    return output_file

# 使用示例
my_3d_model = reconstruct_my_image("path/to/your/image.jpg")
多物体场景重建
       def reconstruct_multi_objects(image_path, mask_dir):
    """
    重建场景中的多个物体
    """
    import os
    import glob

    # 加载图片
    image = load_image(image_path)

    # 找到所有掩码文件
    mask_files = glob.glob(os.path.join(mask_dir, "*.png"))
    print(f"找到 {len(mask_files)} 个物体掩码")

    results = []

    for i, mask_file in enumerate(mask_files):
        print(f"正在重建第 {i+1}/{len(mask_files)} 个物体...")

        # 加载掩码
        mask = np.array(Image.open(mask_file).convert('L'))

        # 重建这个物体
        output = inference(image, mask, seed=i*42)

        # 保存结果
        output_file = f"object_{i:03d}.ply"
        output["gs"].save_ply(output_file)

        results.append({
            "object_id": i,
            "mask_file": mask_file,
            "output_file": output_file,
            "output": output
        })

        print(f"物体 {i+1} 重建完成: {output_file}")

    print(f"所有物体重建完成!共生成了 {len(results)} 个3D模型")
    return results

# 使用示例
scene_results = reconstruct_multi_objects(
    "path/to/scene/image.jpg",
    "path/to/masks/directory"
)
高级功能示例
       def advanced_reconstruction_with_options():
    """
    带各种选项的高级重建
    """
    # 加载图片和掩码
    image = load_image("your_image.jpg")
    mask = load_single_mask("mask_directory", index=0)

    # 可以调整的参数
    reconstruction_options = {
        "seed": 42,                    # 随机种子,控制结果的随机性
        "num_views": 8,               # 生成的视角数量
        "resolution": 512,            # 输出分辨率
        "quality": "high",            # 质量设置:low/medium/high
        "texture_detail": "fine"      # 纹理细节:coarse/medium/fine
    }

    print("开始高质量3D重建...")
    output = inference(
        image,
        mask,
        **reconstruction_options
    )

    # 保存不同格式
    output["gs"].save_ply("model.ply")           # Gaussian Splatting格式

    # 如果需要其他格式,可以转换
    print("3D重建完成!支持多种格式输出")

    return output

# 批量处理多张图片
def batch_process_images(image_list):
    """
    批量处理多张图片
    """
    results = []

    for i, img_path in enumerate(image_list):
        print(f"\n处理第 {i+1}/{len(image_list)} 张图片: {img_path}")

        try:
            # 这里假设每张图片都有对应的掩码
            mask_path = img_path.replace('.jpg', '_mask.png')

            image = Image.open(img_path)
            mask = np.array(Image.open(mask_path).convert('L'))

            output = inference(image, mask, seed=i)

            output_file = f"batch_result_{i:03d}.ply"
            output["gs"].save_ply(output_file)

            results.append({
                "input": img_path,
                "output": output_file,
                "success": True
            })

            print(f"✓ 成功: {output_file}")

        except Exception as e:
            print(f"✗ 失败: {str(e)}")
            results.append({
                "input": img_path,
                "output": None,
                "success": False,
                "error": str(e)
            })

    print(f"\n批量处理完成!成功: {sum(1 for r in results if r['success'])}/{len(results)}")
    return results
🔧 高级应用
1. 与SAM 3D Body结合
       # SAM 3D Objects 可以和 SAM 3D Body 结合使用
# 处理包含人体的复杂场景

def combine_objects_and_body(image_path):
    """
    结合物体和人体重建
    """
    # 这里需要先安装 SAM 3D Body
    # git clone https://github.com/facebookresearch/sam-3d-body.git

    print("这是一个高级功能,可以同时重建场景中的物体和人体")
    print("具体实现请参考官方的 demo_3db_mesh_alignment.ipynb")

    # 基本思路:
    # 1. 用 SAM 3D Body 重建人体
    # 2. 用 SAM 3D Objects 重建其他物体
    # 3. 将结果对齐到同一个坐标系

    pass
2. 质量优化技巧
       def optimize_reconstruction_quality(image, mask):
    """
    优化重建质量的一些技巧
    """
    # 技巧1:预处理图片
    # 调整亮度、对比度等可能会改善效果
    from PIL import ImageEnhance

    enhancer = ImageEnhance.Contrast(image)
    image = enhancer.enhance(1.2)  # 稍微增加对比度

    # 技巧2:掩码优化
    # 确保掩码边缘平滑
    import cv2
    mask_smooth = cv2.GaussianBlur(mask, (3, 3), 0)

    # 技巧3:多次运行取最佳结果
    best_output = None
    best_score = 0

    for seed in [42, 123, 456, 789]:
        output = inference(image, mask_smooth, seed=seed)

        # 这里可以添加质量评估逻辑
        # 比如检查生成的几何复杂度、纹理清晰度等
        score = evaluate_quality(output)  # 自定义评估函数

        if score > best_score:
            best_score = score
            best_output = output

    return best_output

def evaluate_quality(output):
    """
    简单的质量评估(你可以根据需要改进)
    """
    # 这里只是示例,实际可以更复杂
    return np.random.random()  # 随机分数,实际使用时请替换
3. 结果后处理
       def post_process_results(output, output_path):
    """
    对重建结果进行后处理
    """
    import open3d as o3d

    # 保存原始结果
    output["gs"].save_ply(output_path)

    # 加载为Open3D点云进行后处理
    pcd = o3d.io.read_point_cloud(output_path)

    # 去除噪声点
    pcd, _ = pcd.remove_statistical_outlier(nb_neighbors=20, std_ratio=2.0)

    # 平滑处理
    pcd = pcd.filter_smooth_simple(number_of_iterations=5)

    # 保存处理后的结果
    processed_path = output_path.replace('.ply', '_processed.ply')
    o3d.io.write_point_cloud(processed_path, pcd)

    print(f"后处理完成: {processed_path}")
    return processed_path
🎨 实际应用案例
1. 电商产品3D展示
       def create_product_3d_showcase(product_image_path):
    """
    为电商产品创建3D展示
    """
    print("为电商产品创建3D模型...")

    # 加载产品图片
    image = load_image(product_image_path)

    # 创建产品掩码(假设产品占据图片中心区域)
    h, w = image.height, image.width
    mask = np.zeros((h, w), dtype=np.uint8)

    # 简单的中心区域掩码
    center_x, center_y = w // 2, h // 2
    radius = min(w, h) // 3
    y, x = np.ogrid[:h, :w]
    mask_area = (x - center_x) ** 2 + (y - center_y) ** 2 <= radius ** 2
    mask[mask_area] = 255

    # 生成3D模型
    output = inference(image, mask, seed=42)

    # 保存为电商展示格式
    showcase_file = "product_3d_showcase.ply"
    output["gs"].save_ply(showcase_file)

    print(f"产品3D展示模型已生成: {showcase_file}")
    print("可以集成到电商网站的3D查看器中!")

    return showcase_file
2. 室内设计辅助
       def interior_design_assistant(room_image_path):
    """
    室内设计辅助工具
    """
    print("分析室内场景并生成3D模型...")

    # 这里可以结合其他工具进行房间分割
    # 比如先用语义分割找出家具

    furniture_items = [
        "沙发", "茶几", "电视", "书架",
        "台灯", "植物", "装饰画"
    ]

    results = {}

    for item in furniture_items:
        print(f"正在重建: {item}")

        # 这里需要结合物体检测和分割
        # 简化示例,实际使用需要更复杂的处理

        # 假设我们有了对应的掩码
        mask_file = f"masks/{item}_mask.png"
        if os.path.exists(mask_file):
            image = load_image(room_image_path)
            mask = np.array(Image.open(mask_file).convert('L'))

            output = inference(image, mask)

            item_file = f"furniture_{item}.ply"
            output["gs"].save_ply(item_file)

            results[item] = item_file
            print(f"✓ {item} 重建完成")
        else:
            print(f"✗ 未找到 {item} 的掩码")

    print(f"室内设计3D重建完成!生成了 {len(results)} 个家具模型")
    return results
3. 教育和科研应用
       def educational_3d_models(specimen_images):
    """
    为教育目的创建3D标本模型
    """
    print("为教育创建3D标本模型...")

    educational_models = []

    for i, specimen_path in enumerate(specimen_images):
        print(f"处理标本 {i+1}: {os.path.basename(specimen_path)}")

        # 加载标本图片
        image = load_image(specimen_path)

        # 创建标本掩码(假设标本在图片中央)
        mask = create_center_mask(image.size)

        # 生成高质量3D模型
        output = inference(image, mask, seed=i*10)

        # 保存教育用模型
        model_name = f"specimen_{i:03d}_{os.path.basename(specimen_path).split('.')[0]}.ply"
        output["gs"].save_ply(model_name)

        educational_models.append({
            "name": os.path.basename(specimen_path),
            "model_file": model_name,
            "description": f"3D model generated from {specimen_path}"
        })

        print(f"✓ 标本模型生成完成: {model_name}")

    # 生成教育资源清单
    with open("educational_3d_models.json", "w") as f:
        import json
        json.dump(educational_models, f, indent=2, ensure_ascii=False)

    print(f"教育3D模型库创建完成!共 {len(educational_models)} 个模型")
    return educational_models

def create_center_mask(image_size):
    """创建中心区域掩码"""
    w, h = image_size
    mask = np.zeros((h, w), dtype=np.uint8)

    # 椭圆形掩码
    center_x, center_y = w // 2, h // 2
    a, b = w // 3, h // 3  # 椭圆的长短轴

    y, x = np.ogrid[:h, :w]
    mask_area = ((x - center_x) / a) ** 2 + ((y - center_y) / b) ** 2 <= 1
    mask[mask_area] = 255

    return mask
🤝 相关资源
学习资源
更多文章

Manus 推出 Cue:给每个人一个有邮箱、电话和钱包的 AI Agent
ZCode 说只是做索引,可它翻开的不止当前代码

OpenClaw 2.0 发布:Agent 终于能把没做完的事接着做
“牛来”揭面:智谱 GLM-5.3-Flash 匿名期跑出 44 万亿 Token
GLM-5.3 发布:基座没换,智谱把后训练推到数十倍任务环境

DeepSeek Harness 开源:把 Agent 的整套运行底座拆开了
FFmpeg 9.0 “Lei” 发布:这个版本号,纪念一位中国音视频开发者
DeepSeek-V4-Flash 正式上线:性能超过 GLM,逼近 Opus 4.8,价格更狠
GPT-5.6 Luna 直接降价 80%:百万 Token 输出只要 1.2 美元
相关文章
暂无相关文章