Stable Diffusion 3.5 Installation Guide for ComfyUI Platform

On October 22, 2024, StabilityAI officially released the new Stable Diffusion 3.5. This represents a major upgrade and improvement over the previously controversial SD3 version. The newly released model maintains its open-source nature while implementing responsible measures to prevent misuse.
Comparing the Three Versions of Stable Diffusion 3.5
Currently, SD3.5 offers three different versions to meet various user needs:
| Model Version | Parameters | Resolution Support | Key Advantages | Best Use Cases |
|---|---|---|---|---|
| SD 3.5 Large | 8B | 1M pixels | • Most powerful base model • Exceptional image quality • Precise prompt response | Professional high-quality creation |
| SD 3.5 Large Turbo | 8B | 1M pixels | • Optimized version of Large • Quick generation in 4 steps • Maintains high quality output | Projects requiring rapid iteration |
| SD 3.5 Medium | 2.5B | 250K-2M pixels | • Compatible with standard GPUs • Optimized architecture • Easier to fine-tune | Personal creation and small commercial use |
Licensing and Usage Guidelines
- All model weights can be freely customized
- Free for commercial use under $1M annual revenue
- Follows the StabilityAI Community License Agreement
- Enterprise users can check the official licensing page for detailed information
This tutorial will focus on installing and using SD3.5 on the ComfyUI platform. Currently, A1111 version is not supported yet, and the ForgeUI team is working on development. We’ll update the tutorial accordingly.
Follow @SD_Tutorial for the latest updates
Table of Contents
Installation
For newcomers, you must first install ComfyUI on your machine. Existing users should update ComfyUI by navigating to Manager and selecting “Update ComfyUI” and “Update All”. We’ve listed various community releases. Choose based on your needs and system configuration.
Type A: StabilityAI’s Stable Diffusion 3.5
This official version is ideal for users with powerful GPUs who want to use the original models.
1. The three model variants are as follows:
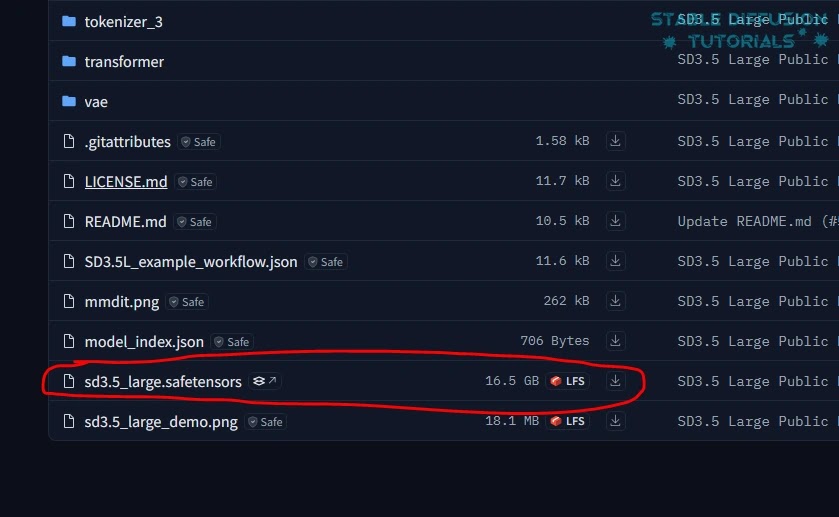
(a) Download Stable Diffusion 3.5 Large model weights from StabilityAI’s Hugging Face.
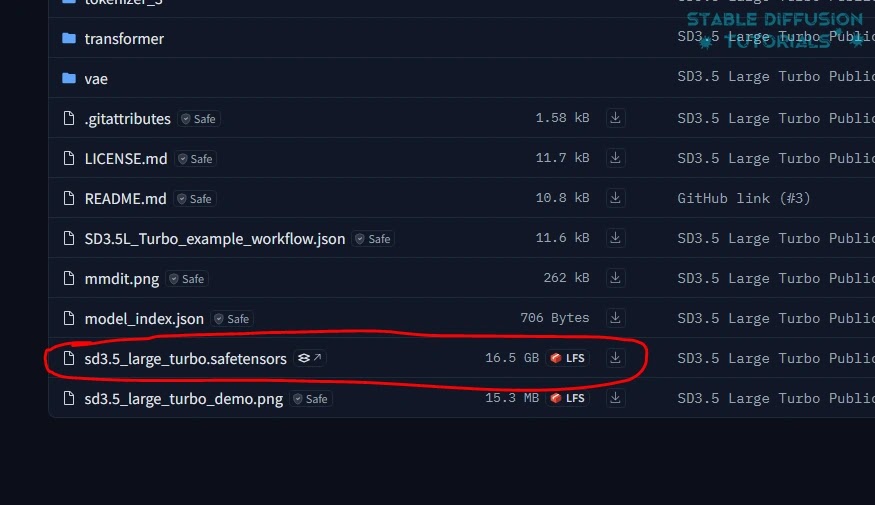
(b) Download Stable Diffusion 3.5 Large Turbo model weights from StabilityAI’s Hugging Face.
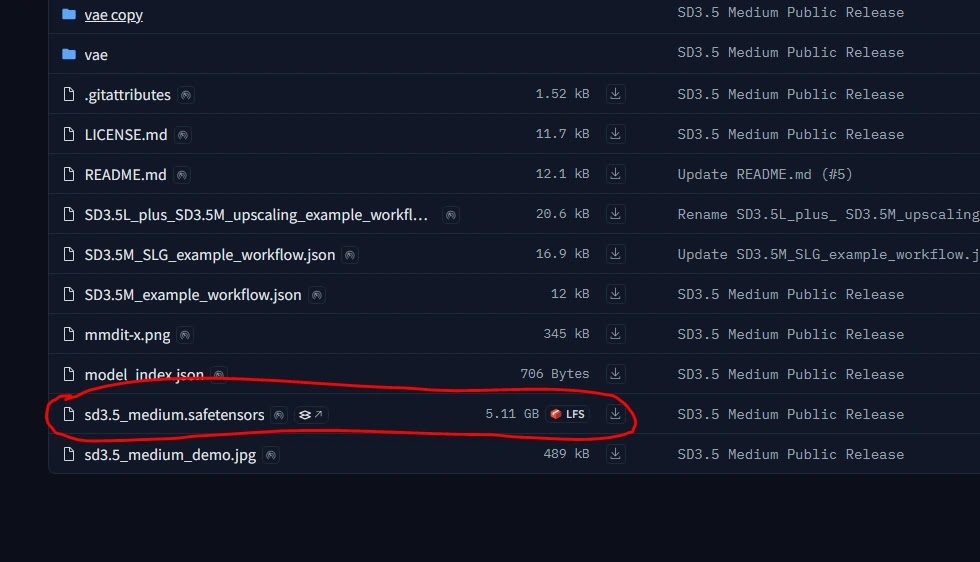
(c) Download Stable Diffusion 3.5 Medium model weights from StabilityAI’s Hugging Face.
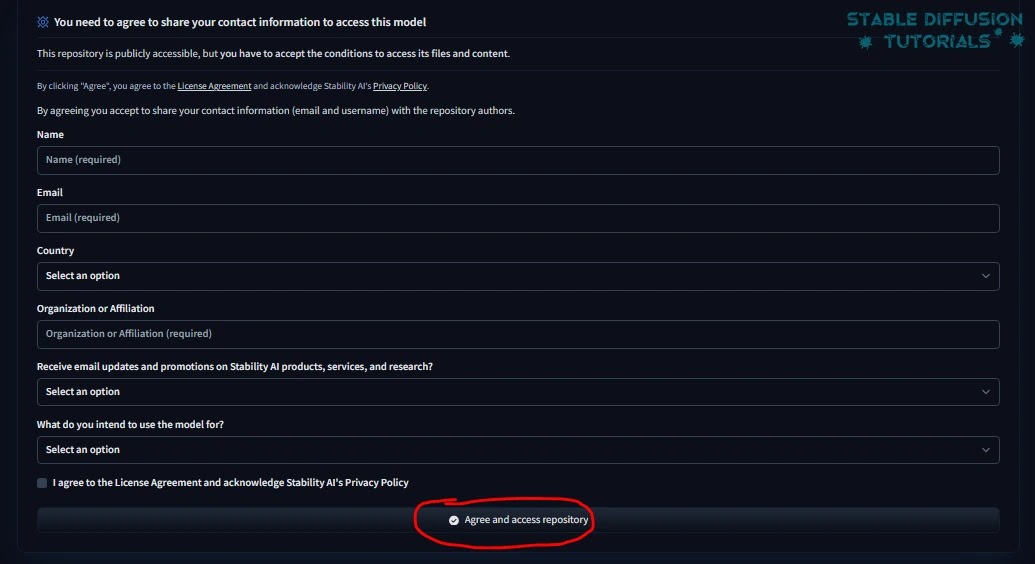
2. First-time downloaders need to accept their license and agreement to access their repository.
3. Save the downloaded files in the “ComfyUI/models/checkpoint” folder.
5. Now, download the clip models (clip_g.safetensors, clip_l.safetensors, and t5xxl_fp16.safetensors) from StabilityAI’s Hugging Face and save them in the “ComfyUI/models/clip” folder.
Stable Diffusion 3 users don’t need to download these as Stable Diffusion 3.5 uses the same clip models. Just verify that you have the corresponding clip models in the required directory.
4. Restart ComfyUI to apply changes.
Type B: Stable Diffusion 3.5 GGUF Quantized Version
The quantized version produces good quality without affecting many image pixels. This is excellent for Mac machines with M1/M2 chips.
It consumes less GPU and has shorter rendering times. The GGUF Loader specifically works on GPU to improve overall VRAM performance. It uses the T5 text encoder to reduce VRAM consumption.
1. Update ComfyUI by clicking “Update All” in Manager.
2. Move to the “ComfyUI/custom_nodes” folder. Navigate to the folder path location and type “cmd” to open command prompt.
GGUF Flux users who already have this repository installed don’t need to reinstall. Just update it. Move to “ComfyUI/custom_nodes/ComfyUI-GGUF” folder and type “git pull” in command prompt. Download the SD 3.5 quantized model weights mentioned in step 5 and save to the appropriate folder.
3. Then install and clone the repository by copying and pasting the following into the command prompt:
git clone https://github.com/city96/ComfyUI-GGUF.git4. For portable users, move to “ComfyUI_windows_portable” folder. Navigate to the folder path location and type “cmd” to open command prompt.
Use this command to install dependencies:
git clone https://github.com/city96/ComfyUI-GGUF ComfyUI/custom\_nodes/ComfyUI-GGUF .\\python\_embeded\\python.exe -s -m pip install -r .\\ComfyUI\\custom\_nodes\\ComfyUI-GGUF\\requirements.txt5. The repository lists multiple models. Download any of the following pre-quantized models:
(a) Stable Diffusion 3.5 Large GGUF
(b) Stable Diffusion 3.5 Large Turbo GGUF
(c) Stable Diffusion 3.5 Medium GGUF
Save them to “ComfyUI/models/unet” directory. Here, all clip models are already handled by CLIP loader. So, you don’t need to download this.
However, if you want, you can download and save the t5_v1.1-xxl GGUF model from Hugging Face to “ComfyUI/models/clip” folder according to your GGUF model.
6. Restart and refresh ComfyUI to apply changes.
Workflow
1. You can download all corresponding workflows from StabilityAI’s Hugging Face.
2. Drag and drop any workflows to ComfyUI.
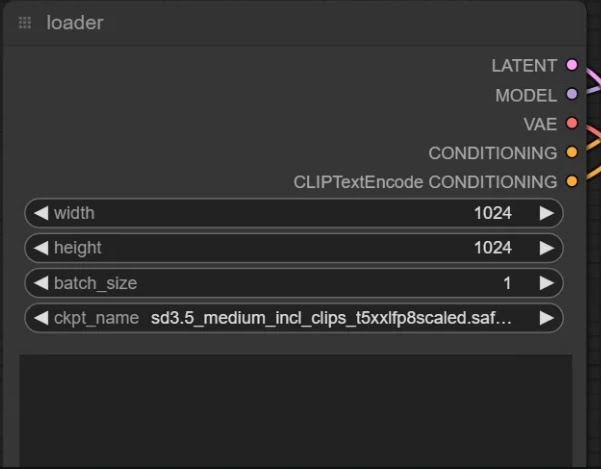
3. Load the corresponding model checkpoint from the loader node.
4. Set the related configuration from the KSampler node.
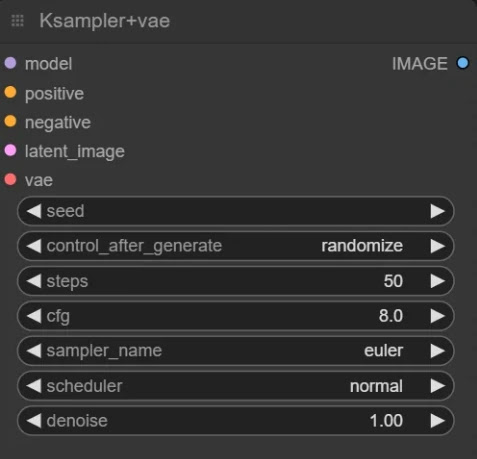
StabilityAI recommended settings:
| Model | CFG | Steps | Sampler |
|---|---|---|---|
| Stable Diffusion 3.5 Large | 4.5 | 28-40 | Euler, SGM Uniform |
| Stable Diffusion 3.5 Large Turbo | 1 | 4 | Euler, SGM Uniform |
We tested the official Stable Diffusion 3.5 Large with recommended settings.

This is the result. Honestly, this result is not carefully selected. This is our first generation. It’s okay. But the dress is a bit unrealistic.
| Parameter | Value |
|---|---|
| Prompt | portrait , high quality creative photoshoot of a model , black dress, bluish hair, red lipstick, wearing funky sunglasses, Vogue style, fashion photoshoot, professional makeup, uhd |
| CFG | 4.5 |
| Resolution | 1024 x 1024 |
| Steps | 28 |
| Hardware | NVIDIA RTX 4090 |
| Generation Time | 22 seconds |
You can get more prompt ideas from our Image Prompt Generator, which is specifically designed to generate images using Stable Diffusion models.
The model has been trained using NLP (Natural Language Processing), using a clip-based model. Therefore, you can use any LLM, such as Tipo LLM Extension or a GPT4-based LLM, which will improve and generate prompts similar to natural language.
Let’s try another one. Like a horror movie scene with different configurations.

| Parameter | Value |
|---|---|
| Prompt | a woman, stands on the roof of a rundown trailer, character with a haunting presence due to her posture, standing in a long dress, gaze locked forward, under ominous weather, realistic, uhd |
| CFG | 4.5 |
| Resolution | 1024 x 1024 |
| Steps | 40 |
Here, the result looks quite satisfactory. The prompt follows well. Our experience is that detailed prompts produce quite good results.
Now, let’s try an image with human fingers to see how it performs.


More Articles
![OpenAI 12-Day Technical Livestream Highlights Detailed Report [December 2024]](/_astro/openai-12day.C2KzT-7l_1ndTgg.jpg)

